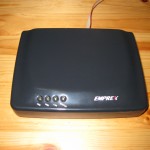
I recently got an Emprex NSD-100 from eBuyer, as they were dirt cheap. The purpose of this device is to sit on your network and have a hard disk attached, and sit there just doing BitTorrent downloads all the time, even when your computer is off. Needless to say this is no use to me at all, but it’s a low-power, small box with an ARM processor, 64MB of RAM, USB and Ethernet that other people have hacked to use their own Linux systems on.
Cracking it open
The best way to get Linux on this thing is to get to its bootloader. This is the piece of software that first runs on the device, a bit like the BIOS on your home PC. Its job is to set up the hardware ready for things like a kernel to run, and in our case it can also download a kernel from a TFTP server and run it instead of the built-in version.
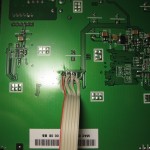
To communicate with the bootloader, we need a serial port. Once you open the NSD-100 there is an obvious single unpopulated header, which serves as the serial port. All you need to do is solder on a ribbon cable on the underside of the board, and you get a 3.3V TTL level serial port. By soldering a ribbon cable on the underside of the board, there is no need to remove the EMI shield on the top side of the board.
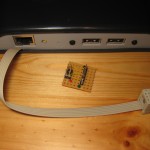
If you’re careful you can close the box back up without modification and keep it reasonably tidy. Of course since the pinout follows no standard you need to build an adapter for whatever serial cable you use. If you’re using an FTDI serial cable (or equivalent) make sure you use a 3.3V variant!
The adapter from NSD-100 to FTDI cable should have the following pinout:
| NSD-100 | FTDI |
|---|---|
| 1 (TX) | 2 (RX) |
| 2 (RX) | 3 (TX) |
| 3 (?) | NC |
| 4 (?) | NC |
| 5 (+3.3V) | NC |
| 6 (GND) | 6 (GND) |
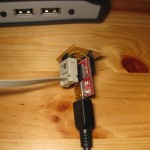
My adapter, shown on the right, needs making a bit more permanent by soldering the wires down on the solder side rather than the very poor attempt at wire-wrapping I managed, but it works most of the time.
Talking to the bootloader
The NSD-100 uses 38400 8N1 on its serial port. By default all you can see when you plug it in is the kernel boot messages, and you get dropped into a root BusyBox shell. Sadly there isn’t very much you can do with the stock firmware and its ancient 2.4 kernel, but it’s nice to have this level of access without any firmware hacks at all.
If you hold down the reset button (small hole next to the power connector) while you apply power to the device, you get taken to the bootloader prompt. The bootloader is a modified version of ARMboot with a couple of bugs, but they’re easy enough to work around.
One bug is the bootp command has endianness issues, so is virtually unusable unless you perform some nasty hacks in your DHCP/BootP server. You can get around this by assigning a static IP in the environment settings and using the tftpboot command instead.
To change your IP address:
TR9100>printenv
baudrate=38400
ethaddr=00:aa:bb:cc:dd:10
bootcmd=go 0x10020000
ipaddr=192.168.xx.xx
serverip=192.168.xx.xx
netmask=255.255.xx.xx
bootdelay=0

Environment size: 141/4092 bytes
STR9100>setenv ipaddr «IP address»
STR9100>setenv netmask «netmask»
STR9100>setenv serverip «TFTP server IP»
STR9100>saveenv
Un-Protected 1 sectors
Erasing sector  1 ...
Flash sector 1 is erased successfully.
ok.

Saving Environment to Flash...
Erasing sector  1 ...
Flash sector 1 is erased successfully.
ok.
0x10020000

done!
Protected 1 sectors
STR9100>
You probably also want to set bootdelay to something like 5 or 10, so you don’t have to keep pushing the reset button to get into the bootloader. With this set the bootloader waits a few seconds before loading the default kernel and will interrupt the boot process if it receives anything over the serial connection during that time. Remember to run saveenv after any environment variable change you want to keep.
Booting a custom kernel
So now we can talk to the bootloader, the next thing to do is boot our own custom kernel. The easiest and safest way to do this is to download and boot it over the nextwork using TFTP. First, download the pre-built kernel image from tinyhack.com and place it somewhere so that it can be downloaded over TFTP. Installing a TFTP server is left as an exercise for the reader, but I recommend using atftpd on Linux. Next, fire up the bootloader and run the following:
STR9100>tftpboot 0x1000000 zImage-2.6.29
Check MAC/PHY 0 Link Status : UP!
Check MAC/PHY 1 Link Status : DOWN!
ARP broadcast 1
ARP broadcast 2
eth addr: XX:XX:XX:XX:XX:XX
TFTP from server 81.187.xx.xx
; our IP address is 81.187.xx.xx

Filename 'zImage-2.6.29'.
Load address: 0x1000000
Loading: ######## [snip] ########
done
Bytes transferred = 5015120 (4c8650 hex)
STR9100>go 0x1000000
Uncompressing Linux........ [snip] ........ done, booting the kernel.
Linux version 2.6.29joe (yohanes@koala) (gcc version 3.4.4) #32 PREEMPT Sun Mar 29 11:15:39 ICT 2009
CPU: FA526id(wb) [66015261] revision 1 (ARMv4), cr=0000397f
CPU: VIVT data cache, VIVT instruction cache
Machine: STAR_9104NAS
[snip]
BusyBox v1.10.4 (2008-07-20 00:43:02 ICT) built-in shell (ash)
Enter 'help' for a list of built-in commands.

/bin/sh: can't access tty; job control turned off
/ #
Congratulations! You’re now running a custom firmware on the NSD-100. It’s not a huge amount of use at the moment, but it’s a start.
Coming soon!
Compile your own kernel for NSD-100. I’ll show you how to build your GCC toolchain using crosstool-NG and use Tinyhack.com’s patches to build a working custom kernel for NSD-100.
Install Debian Lenny on your NSD-100. This is a proper install, not chrooted like the guide on http://emprex-nas.blogspot.com/ and uses a more recent version of Debian. We sadly can’t use the current stable, Squeeze, due to that having moved entirely to armel (ARM EABI) which is currently unsupported on the FA526 CPU used in the NSD-100.
I am also currently working on porting Tinyhack.com’s kernel patches to more recent kernels, though this is a work in progress and nothing is working yet! 🙂
References
- Thread on freebsd-embedded mailing list – Low cost ARM9 SoC board – NSD100/NCB3AST
- “Emprex P2P Download Engine NSD-100” on Blogspot
- Tinyhack.com – Agestar blog caterory, Agestar web pages
- Plett’s NSD-100 photos on Flickr


hey!! what a wonderfull job.. i also bought this machine from ebuyer recently and have been trying to install plowshare on it having already chrooted to debian etch… however the default kernel is quite old and i dont know how to upgrade it and merge it in the default firmware… as you are definitly a pro on this is it really possible ? thanks
It’s possible but it will be quite a bit more work before we can have a reasonably simple system to do this sort of thing. I expect the only way to do it will be to completely replace the current firmware with our new kernel and boot a system off USB. I believe there is also currently a project to get OpenWRT running on the NSD-100 which may be closer to what you’re looking for.
Hey.
Firstly thanks for all the info you’d provided, while I want to use custom firmware on the NSD, I’ve not a clue on how to go about it without cracking open the box like yourself.
I have some knowledge of Linux but I can’t even telnet into the box (following the instructions on emprex-nas.blogspot.com) whenever I modify the smb.conf (using other pc running Linux) the box loses all user and share info and reports that there is no hard disk installed, the only fix is to format the drive and start again.
Any ideas?
Thanks.
Sorry, I have no idea – I’ve only done it using the serial port and opening the box.
Hi Chris
Thanks for this! Question – the NSD-100 has a 180MHz processor and 64MB RAM, which in my mind should be plenty for a dedicated print server and occasional file server, but it locks up my clients on practically every other request I send to it! Is that likely to be a firmware issue that can be circumvented by your custom firmware/Debian combo? Or am I better off chrooting it?
Phil, I’m not really sure as my device has been rock solid stable, but I never used the firmware it came with (other than to test it powered on). I bought it just for hacking with.
I expect the 64MB RAM should mostly be enough for that sort of use, though it is very tight. Any large print job may indeed cause it to run out of memory. Using an external USB hard disk with a swap partition would certainly resolve that issue, but that’s obviously not ideal for a print server…
Great – yep I plugged in a HDD and formatted it through the web interface, works fine now. I can’t believe what a bargain these are! Look forward to seeing your progress on the project.
yes i agree the device is rock solid on firmware installed with it.. i am using it for daily heavy print jobs and so far it hasnt jammed once.. although i also have ks-330 which in comparison is more fast and running snake os on it..
to the above comment about telneting it .. it is very easy if u follow the guide properly and once you have u can enable ssh via chrooted debian…. however i m facing a chalenging situation trying to run plowshare on it which so far becoz of its crappy old kernel is giving errors
after debian can you add BT client like transmission and would you be able to benefit from faster speed and more reliablity and still download to the external harddrive? Also, can you use any remote power down options after downloading is complete?
Hi again.
After many hours and failed attempts I still cannot access telnet using the latest firmware, although I didn’t give up that easy, I got really annoyed in the end, so I downloaded a different firmware version for a model similar to the NSD (which only had 32MB ram VS the 64MB in the NSD), and finally I got access (couldn’t chroot though just blurts out “format error”).
It turns out that the XFS file system gets corrupted when you edit files on the hard drive via another machine (in my case the latest Ubuntu) I’ve checked all file permissions etc, even tried to recreate the partitions. it’s not having any of it.
I think I’ll try an older version of Ubuntu next.
I’ve also noticed that Gparted complains that the partitions are recursive, which is a bit strange.
Chris: Would it be possible for you to create a custom firmware for the NSD, I’ve looked through tinyhack.com (also http://code.google.com/p/nsb3ast/wiki/howto) and read the how to do it without a serial port, but without any way of me unbricking it (which a number of posters on tinyhack.com have done) it would be a big help.
Cheers.
Why have I only just found this site?
I have just released a hacked version of the latest firmware for this . Basical I have opened a telnet from boot and got the system to run a script at boot form a plugged in harddisc.
http://emprex.codejs.com/viewtopic.php?f=23&t=601
It is quite straight forward to edit the file system and do allsorts without opening the box , all done across the network. The debian I have is an old etch one , the repository for this moved on 19th feb to the archive sectin , but you can still get at it. running lighttpd on my nsd100. I would try lenny but I dont know where to get or how to build a debian fs for it. Most of my work is posted at emprex.codejs.com . The flash image I have made leaves all the original firmware in place s as not to break anything. It just runs up a telnet daemon and then loads and runs a script called “boot” in the root of the data/public share. There is no need to access the public share to get telnet any more.
@pale: I’ve tried to register on that forum, but can’t because the register form is broken (captcha code doesn’t appear)
Could you post your firmware somewhere else?
Thanks.
http://www.dci2000.eclipse.co.uk/kau/p2p/V03R14_pale.bin
http://www.dci2000.eclipse.co.uk/kau/p2p/boot
(save boot file dont cut/paste )
This is a temporary location If you can host these files so that google will find them please do. This mod I feel opens up a lot of possibilities. Virtual desktops , newer sftware etc.
enjoy
Pale
I have asked emprex.codejs.com to fix this login problem. They are having trouble with spam posts.
http://www.dci2000.eclipse.co.uk/kau/p2p/
@pale very impressive update ill try it soon.. however is it anywhere near possible that you can upgrade the kernel on it to 2.6 something ??? kindly let know thanks
I’m afraid that recompiling is beyond my abilities at the moment. I have been fiddling with the debian and have got deco,lighttpd,php5,python,mldonkey and vncserver/xwindows running. I can now run GUI software on the device ( some what slow though ) . This is all from the “etch” 2.4 repositories though.
the emprex.codejs.com login should now be working
Hello. I purchase a NSD-100 and when I upgrade the firmware V03R14_eon.bin, the NAS turn brick. How I can load the original firmware?
Thanks
I bought this in 2008 and it is a nice device, but I cannot use it now as many popular tracker sites like http://www.thebox.bz would ban me for using the torrent client in this firmware. So I am watching this blog with much interest!
just wondering if there is any update regarding your work on this project as everything seems to be quite…. i have installed pales hacked rom and i am glad as telnet is open on boot.. but the startup script is kinda screwed i cannot start twonky on boot.. anyway i am still looking for someway to upgrade the kernel to 2.6 can anyone help in that regard.. thanks!
Unfortunately other things have taken precedence to this project for the moment. One thing that has really made things difficult is the kernels for the board are so old and the code is quite nasty, which makes porting it to a newer kernel very difficult.
2.6 kernels are available though, and I have been running one for quite some time…
i just noted that you booted this machine with tftpboot 0x1000000 zImage-2.6.29 <—- kernel but at the same time say its not really working… can u kindly make hacked rom with this kernel thanks
I’ve mentioned before, I’m not interested in making a ‘hacked ROM’ for the NSD100 that retains existing functionality. The purpose for my hacking is to get a more recent kernel on the device and use it as a more general purpose Linux device – so no Torrent client and no nice web GUI to run it.
oh thats wonderful can u kindly let know how i can make use of this kernal 2.6 on my nsd ? it will be a great help as i will be able to run plowshare… i bought two of these devices from ebuyer.. one is being used as print server but i want to utilize other one solely as plowshare downloader and twonky server thanks
i am not interested in web gui or the torrents.. just the above two
please update me if you have any new news regarding this project whenever ill be interested 🙂 lastly thanks alot for responding so promptly takecare
is it possible to run chrooted debian according to your guide of running kernel 2.6 using tft server?? then i guess it will serve me the same purpose.. as i want to run chrooted debian anyway thanks 🙂
You can get around this by assigning a static IP in the environment settings and using the tftpboot command instead.